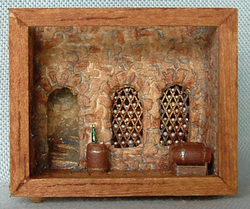
1:144 Scale Wine Cellar Vignette.
Part 1
Tools and Supplies:
• General
o Craft glue
o Sharp pencil, metal ruler marked in mm
o Craft knife with sharp (new) blade
o Gluing jig (or Lego blocks)
• For structure:
o Mat board
o Polyfilla
o Sharp tool to mark out stones.
o Water Colour Paints: Yellow Ochre, Burnt Umber, Payne’s Grey, White
o Acrylic sealer (I used DecoArt Multipurpose Sealer)
• For wine racks and shelves:
o 1,5 mm Diamond Mesh
o Brown Enamel paint
o Scraps of Paperwood
o 1/16 inch hole punch
o Accent beads (Tiny no-hole beads), gold and silver
• For wine bottles:
o Round toothpicks
o Fine sandpaper
o White craft paint
o Glass paints (green, blue)
o Gel Pen (Gold)
• For barrels:
o Tiny turning
o Needle file or emery board
o Brown craft paint (DecoArt Americana Light Cinnamon)
o Gel Pen (Gold)
• Floor:
o Thin handmade paper, or any paper with a coarse texture.
o Matt sealer
o FolkArt Antiquing Medium (811 Down Home Brown)
• Finishing touches:
o Thin textured paper to cover the outside of the box
o Piece of transparent packaging material for the roof
o 3mm (1/8 inch) wide wood strip or molding for the frame
o 4 round beads for feet underneath the box.
Genral information:
Read through this part before carrying on.
The stones:
I know I should have practiced on a piece of card before I jumped in the deep end with these Polyfilla stones, but that is so unlike me! So I just experimented as I went along.
How NOT to do it:
At first I used the ordinary wood filler (the paste), and just applied it to the wall, and marked out the stones. I didn’t add glue, so after it has dried, it started coming off the walls. I had to redo a few spots.
I then painted it with diluted grey watercolours, let it dry, and then sponged on a brown shade. I wiped some of it off while wet, to highlight the stones, but then the white came through again. I also wiped off some of the stones. The paint was a too thick, so it took away the little detail that was left, after I rubbed off the stones! This method didn’t work very well, as you can see in the first pictures. Fortunately most of that is behind the arched wall, so not much harm done. I’m just telling you this, so you know why the first pictures show these terrible walls!
How to do it:
- I’m sure there are hundreds of methods to do 144 scale stones, but this is what worked best for me.
- This time I decided to colour the stones before I started. The theory is that once I have wiped off the grey paint of the grouting, the natural colour of the stones would come through, and I won’t be stuck with white stones needing to be covered up again.
- Mix the polyfilla (a powder) with a little bit of water, some craft glue, and brown watercolours ( I used Yellow Ochre and Burnt Umber). It can be quite dark, as it will lighten a bit as it dries.
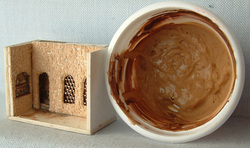
Fig.1 - This shows the original colour of the Polyfilla mixture, and the colour of the stones after it has dried.
- Apply to the surface, and level with a toothpick. You only need a thin layer, just enough to show the markings between the stones.
- Take your needle tool, and mark out the stones. Vary the shapes and sizes, but keep the rows roughly horizontal, so that it looks like a weight bearing wall. Don’t worry too much about a too uneven surface, you can get rid of that later. Work quickly, the mixture will dry rapidly.
- Leave to dry.
- When its totally dry, rub very lightly with your finger across the stones, to get red of sharp edges.
- Paint with matt acrylic sealer. I suppose you can leave this step if you want, but I just felt that sealing the first layer, will make it easier to correct any boo-boo’s that may follow!
- Now dilute some grey water colour paint with water, and paint the wall. Immediately dab with a dry paper towel, to hopefully clean the stones, and leave the grey paint in the grooves between the stones. Make sure that the paint is thin enough to run, or you will struggle to clean the stones. If the paint is not to thick, dabbing alone will clean the stones, and the grey grouting will stay where its supposed to be.
Building the Structure:
• Cut out pieces A to G from mat board. (The box is 26 mm high, 36 mm wide, and 20 mm deep).
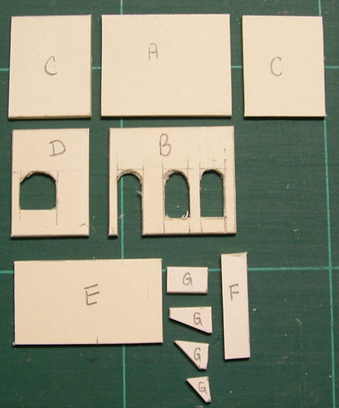
Fig.2 - Pattern pieces (Not to scale).
A: 34,5 mm x 26 mm
B: 33 mm x 26 mm
C: 26 mm x 20 mm (x 2)
D: 26 mm x 18,5 mm
E: 36 mm x 20 mm
F: 26 mm x 5 mm
G: See Fig. 3 a-d
B: 33 mm x 26 mm
C: 26 mm x 20 mm (x 2)
D: 26 mm x 18,5 mm
E: 36 mm x 20 mm
F: 26 mm x 5 mm
G: See Fig. 3 a-d
 Fig 3a |
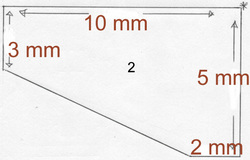 Fig. 3b |
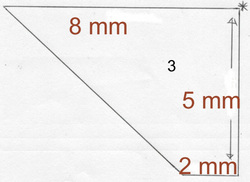 Fig. 3c |
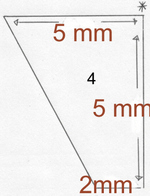 Fig. 3d |
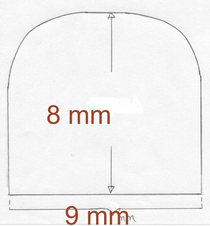 Fig. 4a. Arch in wall D. |
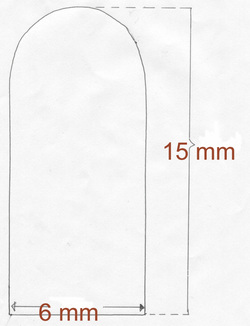 Fig. 4b. Door template (adapt for alcoves in wall B.) |
Wrap a piece of sandpaper around a thin dowel, and sand the curves of the arches smooth.
• Glue the staircase pieces together, taking care that you maintain a 90 degree angle at both the right and left sides. After it has dried, make sure that its not wider than 5mm, or it will not fit into the space for the staircase. Trim or sand down if necessary.
• Very important! Seal both sides of all the card pieces with the acrylic sealer, including the cut sides. That is prevent the moisture of the wall treatment penetrating the card, causing it to warp.
