Part 3
Wine racks in the back wall:
- Here I took a shortcut! I couldn’t see how I could make the shelves for the wine bottles in the alcoves, and add bottles in this scale, so I had to make another plan. (The original 1/12th scale wine racks can be seen under Roomboxes/Wine Cellar). I discovered some fine mesh in my stash, that a mini friend gave me once, and decided that it could be wine racks. I had to suggest the illusion of wine bottles lying flat in the racks, so I glued tiny no-hole beads (balantine) to the bottoms of the diamond shaped openings, to resemble the bottle tops. The back of the shelves are dark inside, so seeing just the capsules of the bottles will leave the rest to your imagination. This tiny scale (1:144) is about illusion and fooling the eye, so this is a perfect example of that principle.
- Here I took a shortcut! I couldn’t see how I could make the shelves for the wine bottles in the alcoves, and add bottles in this scale, so I had to make another plan. (The original 1/12th scale wine racks can be seen under Roomboxes/Wine Cellar). I discovered some fine mesh in my stash, that a mini friend gave me once, and decided that it could be wine racks. I had to suggest the illusion of wine bottles lying flat in the racks, so I glued tiny no-hole beads (balantine) to the bottoms of the diamond shaped openings, to resemble the bottle tops. The back of the shelves are dark inside, so seeing just the capsules of the bottles will leave the rest to your imagination. This tiny scale (1:144) is about illusion and fooling the eye, so this is a perfect example of that principle.
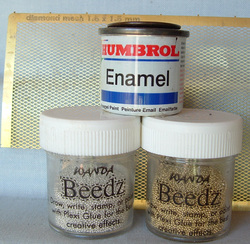
Fig 13 - Supplies needed for the wine racks.
To make the wine racks in the back wall:
• Paint the diamond mesh with a thin layer of light brown paint, just to get rid of the metallic look. (I used brown enamel paint).
• Make sure that the back of wall B is smooth. Sand off any stone bits behind the openings.
• Glue the mesh to the back of wall B.
• Glue tiny accent beads to the bottom of the diamond shaped holes. Use the smallest ones. I used only silver and gold, as the other colours I had were translucent, and made it look like a Christmas tree! Black didn’t work well either, as it was invisible once the wall was glued into place.
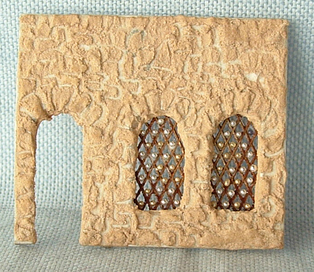
Fig.14 - Accent beads glued to the diamond mesh.
• Glue wall B into place. Apply pressure to ensure a good bond.
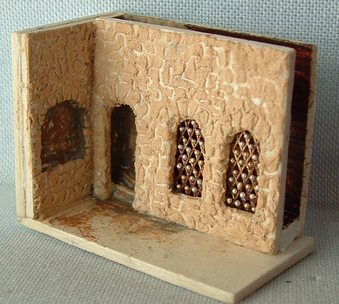
Fig. 15 - Wall after being glued in.
• Slice a 2mm strip of Paperwood, cut to size, and glue 2 shelves into the wide arch on the left wall.
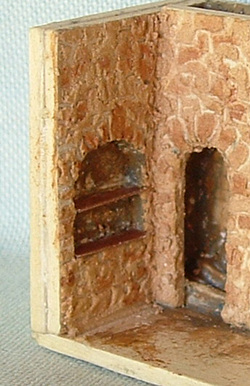
Fig.16 - Paperwood shelves.
• Glue the right hand side wall C into place.
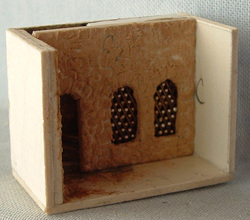
Fig.17 - Right wall C glued into place.
• Do the stones on that wall, and leave to dry.
• Dab some different shades of earth colours onto individual stones, just a shade lighter or darker than the stone colour.
• Seal all the walls with acrylic matt sealer.
• Dab some different shades of earth colours onto individual stones, just a shade lighter or darker than the stone colour.
• Seal all the walls with acrylic matt sealer.
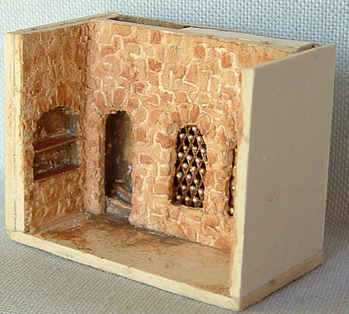
Fig.18 - Shading the stones.
• Dilute some grey watercolour, and wash the walls with it. The colour should go into the lines between the stones, suggesting grouting.
• Dab/wipe the stones with a dry paper towel or cotton bud while the paint is still wet, to bring out the colour of the stones again.
• Dab/wipe the stones with a dry paper towel or cotton bud while the paint is still wet, to bring out the colour of the stones again.
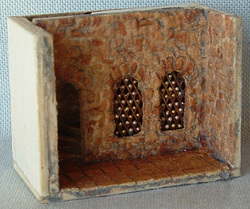
Fig.19 - Stone walls after being washed with grey paint.
